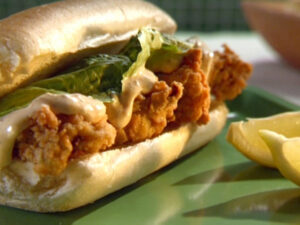
It’s just a bit cooler on the North Fork in October with the verdant of summer still hanging on. Tomatoes remain on the vines and the blossoms of Verbena and Yarrow remain bright in my garden. The peppermint and spearmint continue to chase throught the garden and it appears that summer is hanging on despite the drop in temperature. Oyster lovers call this time of year, the “er” months — September, October, November and December, when oysters are at their best plucked from the chilly waters of the Peconic Bay. I love them raw most times but on a chilly night when you want a hot meal, a crispy oyster po boy on soft buns slathered with some homemade Remoulade is great with a few bottles of local beer from Fire Island. If you can have this by a fireplace — better yet. And if you don’t, come eat them by our fireplace at Cuvee Bistro at The Greenporter.
Try this lighter pan-fried recipe that we’ve paired with some beer from Long Island call Lighthouse Ale from Fire Island. Long Island is making great beer from Blue Point to Southampton Publick House to the Harbor Ale from the Greenport Brewery right here in the Village of Greenport.
And you want to know everything there ever was to know about oysters, read Natalia de Cuba’s book review on Mark Kurlansky’s, The Big Oyster: History on the Half Shell. I happen to be a huge Kurlansky groupie and love every book he ever wrote. From Cod, to Salt to Oysters — this is every food nerd’s dream and Ms. De Cuba certainly does it justice! So visit our book review section and read all about oysters.


Pan Fried Oyster Po’ Boys
For the oysters
2 dozen fresh oysters, shucked
1/3 cup yellow cornmeal
1/3 cup all-purpose flour
1/3 cup dry breadcrumbs
1/2 teaspoon salt
1/2 teaspoon cayenne (or more to taste)
1/2 teaspoon paprika
1 egg, lightly beaten
1/4 cup buttermilk
Oil for frying (see recipe notes)
Combine the cornmeal, flour, breadcrumbs, salt, cayenne and paprika in a pie plate. In another pie plate, whisk together the egg and buttermilk. Add the oysters to the egg-buttermilk mixture and turn gently with a large spoon to coat. Remove the oysters, one by one from the egg mixture with a pair of tongs and place in the crumbs. Turn several times to coat evenly with the crumb mixture, then transfer to a plate and let stand for 10 minutes.
While the oysters “rest,” make the garlic-onion slaw. Place the cabbage and sliced onion in a large bowl and season with salt and pepper. In a separate bowl, whisk together the buttermilk, mayonnaise, garlic, sugar and hot sauce. Add to the cabbage-onion mixture and toss to combine. Taste and adjust the seasoning as needed. Set aside until ready to assemble the sandwiches.
Heat 1/4-inch of oil in a large skillet to 350°F (medium-high). Test the temperature of the oil by adding a pinch of the dry crumb mixture – if it sizzles immediately, the oil is ready. Add 1/2 the oysters and fry until golden brown and crispy, turning once, about 2-1/2 minutes per side. Transfer to a paper towel-lined plate and blot very gently. Repeat with the remaining oysters.
To assemble the sandwiches, line each roll with tomato slices and season them lightly with salt and pepper. Add a portion of the garlic-onion slaw and top with 6 oysters. Serve immediately.
Tips for frying oysters
It’s important to keep a few things in mind when pan frying oysters:
Handle them gently so they remain juicy and plump and be sure to allow the resting time once they’re coated with the crumb mixture. This helps the coating adhere better and takes the chill off the oysters so they don’t cool down the oil as much when added to the pan
Add enough oil to the pan to be equal to about 1/2 the thickness of the oysters. In most cases 1/4-inch depth works well, but if your oysters are especially plump, you may want to add a bit more
Work in batches and don’t overcrowd the pan. Overcrowding will lower the temperature of the oil too much. This can cause the coating to fall off and the oysters to absorb more oil than they should.
Turn the oysters over with tongs when you start to see a little moisture form on the upper side – about 2-1/2 to 3 minutes should do it.
You can keep the cooked oysters warm by putting them on a baking sheet in a single layer and placing them in a preheated 250°F oven for the few minutes it takes to cook the next batch. Just don’t cover them, they’ll get soggy.
If you have an electric skillet, by all means use it. The precise temperature control will provide excellent results.
Remoulade3/4 c. olive oil
1/4 c. lemon juice
1/4 c. Creole mustard
2 tbsp. horseradish
2/3 c. Shallots, chopped
1/8 c. Cornichons, chopped
1/4 c. green onions, chopped
2 tbsp. parsley, chopped
1 tsp. salt
1/8 tsp. white pepper
Dash of Siracha
Dash of worcestershire
Blend all ingredients briskly with a whisk until smooth. May be stored in a jar in refrigerator for several days
Serve with corn-black bean salad and a bowl of North Fork chips
For more information and the history of oysters read our book review on The Big Oyster: History on the Half Shell by Mark Kurlansky


